IP Ranges Authentication Integration
What is it?
This integration allows automatic authentication for specific users based on their originating IP address. Users can access the store without manual login when connecting from pre-configured IP addresses or ranges.
Customers can provide individual IPs or IP ranges from which their users will access the store. This feature supports two modes:
- Direct: Users access from a controlled physical location (e.g., university network, library computers).
- Proxy: Users access remotely through a configured proxy (e.g., EZProxy, campus proxy).
Authentication is triggered via a simple GET request:
https://{customer-store.com}/auth/ip
How does it work?
Auth IP allows users to login automatically using a link without needing to complete a login form. When a user accesses the store from a configured IP address or range, the system checks this address against the allowed list. If a match is found, the user is authenticated automatically.
Direct Authentication Flow
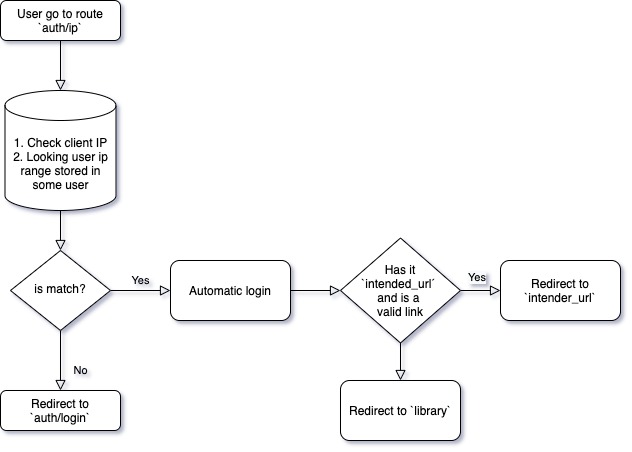
The admin sets a range of IPs (usually University IP ranges) to a specific user. When the user tries to login, the app checks the IP where the user is coming from, and if this IP matches what the admin set for that user, the user is logged in automatically.
Proxy Authentication Flow
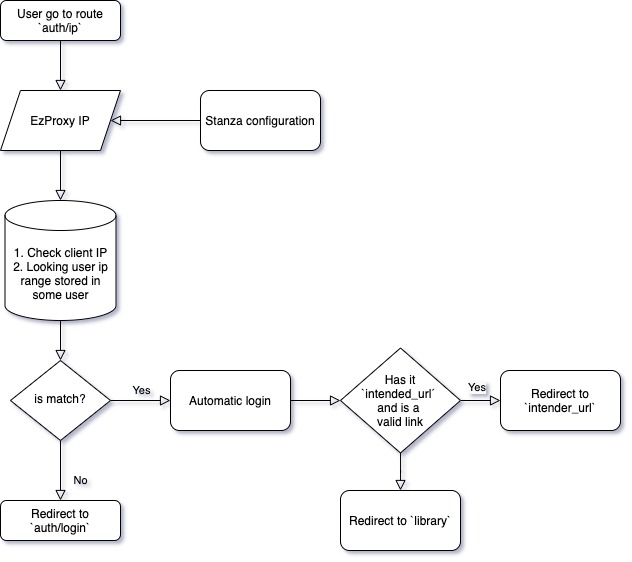
For proxy authentication, customers can configure a proxy system. This is useful when users need to login automatically from outside a physical location (e.g., from home) where IPs were originally configured. The admin configures a proxy with an IP that we use for validation and automatic login.
Backend Service Logic
The LoginByIpService backend service handles this authentication logic. It:
- Validates IPs against
UserIpRangeentries (per user or entry point). - Authenticates the user automatically via
AuthEntryPoint::IP. - Stores session metadata to track the automatic login source.
- Records activity logs with the matched IP and range.
- Accepts the HTTP header
X-USERNAMEto identify the user by email (mandatory for entry point-based authentication). - Automatically creates a new user account if the email doesn't exist.
Pre-requisites
Required for use:
- Have Unlimited or Revenue Share* plan
- Enabled feature "Login By Ip"
Note: For Revenue Share plans, this integration can be configured after selling an external plan and is only configurable after the payment has been approved.
Database Structure
Database Relationship
The user_ip_ranges table, represented by the UserIpRange model, can now have a relationship with either the user table or the entry_point table, depending on the scenario.
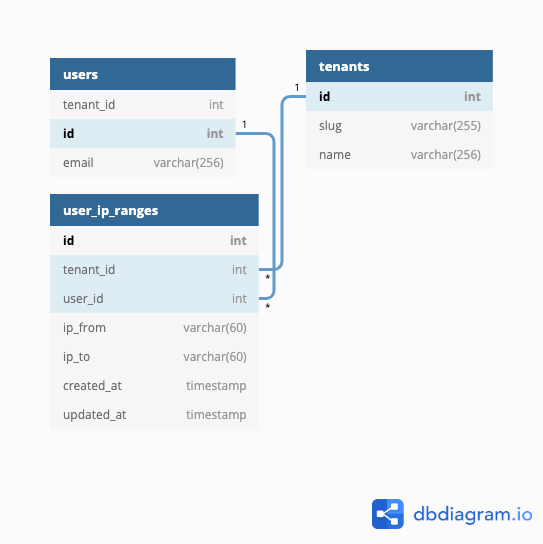
The relationship is many-to-one with users, and the relation with user must be unique. For more details, see: https://dbdiagram.io/d/5eb5d24e39d18f5553feeacd
Configuration Methods
There are two ways to assign IP authentication:
1. User-Based Assignment (Direct Assignment)
Assign IPs or ranges directly to a user from the user management panel.
Configuration Steps:
- Go to
control panel > userin tenant where you have activated the feature - Create a new user or select an existing one
- Select the user and set the IP or IP ranges using option
Assign IP rangesin the secondary menu
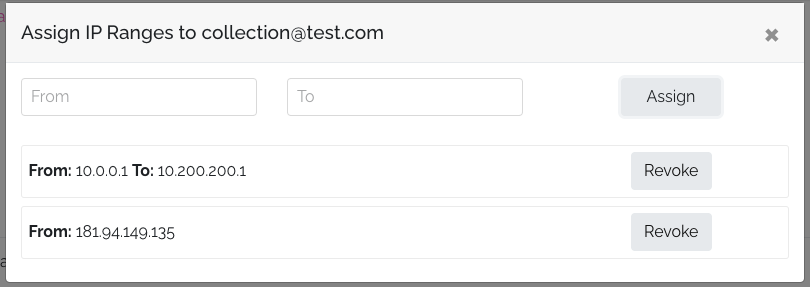
IP Range Examples:
- Single IP: To add a unique IP, enter it in the "From" field and press the assign button.
- IP Range: For an IP range, such as all IPs between
10.0.0.1and10.200.200.255, enterFrom: 10.0.0.1 - To: 10.200.200.255. Any user within this range, such as from IP10.100.120.1, will be automatically logged in.
2. Entry Point-Based Assignment
This method allows you to assign IPs or IP ranges to a specific entry point, which can be used to authenticate users based on their IP address using the X-USERNAME header.
Configuration Steps:
- Access Settings: Navigate to
Settings > Integrationsin the tenant where the feature is activated. - Create or Select Entry Point: Either create a new Entry Point for IP Login or select an existing one.
- Assign IP Ranges: Use the
Assign IP rangesoption in the secondary menu to set the IP or IP ranges. - Plan Association: Associate a specific plan that will be assigned to users upon login.
- Content Access Definition: Define whether users have access to all content.
Backend Enhancements:
- Full test coverage for CIDR conversion and entry-point-based login scenarios.
- Automatic plan assignment support when logging in via IP-based entry points.
- Secure validation and structured session flags for analytics and tracking.
- On-the-fly user creation using the
X-USERNAMEemail header.
Frontend Enhancements:
- Modernized IP assignment components using Tailwind.
- Enhanced user experience for managing IP ranges.
- Improved sorting, error messages, and reactivity in the IP management UI.
Implementation
Client-Side Implementation
Basic Login Button:
<a href="https://your-tenant.com/auth/ip">Login User</a>
JavaScript Implementation:
<button type="button" onclick="loginUser()">Login User</button>

<script>
  function loginUser() {
    return (window.location.href = 'https://your-tenant.com/auth/ip');
  }
</script>
With Intended URL Redirect:
You can set intended_url to redirect user to specific URL inside store, for example a publication link or specific filter:
<a
  href="https://your-tenant.com/auth/ip?intended_url=https://your-tenant.com/reader/publication-name"
  >Login User</a
>
<button type="button" onclick="loginUser()">Login User</button>

<script>
  function loginUser() {
    return (window.location.href =
      'https://your-tenant.com/auth/ip?intended_url=https://your-tenant.com/reader/publication-name');
  }
</script>
Proxy Configuration
For proxies, it's necessary to configure the stanza first. This configuration must be set in the proxy. This stanza is for EZProxies.
You can read more information about stanza structure
Important: HTTPMethod value is necessary for a secure connection between proxy and our server and to ensure everything works correctly. This is because in some cases we need to use PUT requests or other types of requests to get or set information.
EZProxy Stanza Example:
Title Publicala Editions
HTTPHeader -request -process X-XSRF-TOKEN
HTTPHeader -request -process X-CSRF-TOKEN
HTTPMethod PUT
HTTPMethod PATCH
HTTPMethod DELETE
HTTPMethod OPTIONS
HTTPMethod TRACE
HTTPMethod CONNECT
URL app.publica.la/auth/ip
HJ app.publica.la
DJ app.publica.la
After configuring the proxy stanza, you need to configure the IP ranges following the same steps as the direct configuration. The difference is only in the proxy setup.
Troubleshooting
Common Issues
We have identified some common troubleshooting issues related to incorrect IP configuration:
- Incorrect IP Configuration: Wrong IP number set for users
- IP Mismatch: User attempting to log in from a different IP than configured
- Missing X-USERNAME Header: Required for entry point-based authentication
Debug Mode
When users experience login issues, instead of automatic login, the system will show the login form. To diagnose configuration problems, you can add the query parameter ?debug=true to the URL to find out the IP from which the user is coming.
Debug URL:
https://your-tenant.com/auth/ip?debug=true
When you use this URL, you will see a debug screen showing data to verify if the user is configured with the correct IPs. Additionally, in debug mode, you will also see the x-username header, allowing you to validate if it is being sent correctly.

Debug Information Includes:
- Current user IP address
- Configured IP ranges for the user/entry point
- X-USERNAME header value (for entry point authentication)
- Validation status
Important Notes
- IP Uniqueness: The IP or IP range can only be used for one user. You cannot reuse it for another user without clearing it first.
- Admin Access: The configurations can be made by regular admins.
- Email Requirement: For entry point-based authentication, the system validates that the IP is within a range of the entry point and that a valid email is provided via the X-USERNAME header.
IP Discovery Tools
You can use these tools to determine the correct IP for configuration:
- Online Tool: IP location to determine the IP for configuring the user.
- Command Line: Add an alias in your console with the following command to find your IP:
Then run
alias ip="curl icanhazip.com"ipin your console. This should return a number like181.94.149.135.